WWDC21) Build a research and care app, part 1: Setup onboarding
WWDC21) **Build a research and care app, part 1: Setup onboarding**
Build a research and care app, part 1: Setup onboarding - WWDC21 - Videos - Apple Developer
**본 글은 WWDC 를 보고, 번역 및 요약 그리고 실행해보는 스터디 프로젝트의 일환입니다.*
들어가기전에
ResearchKit 과 CareKit 에 대해서 더 많은 정보를 얻고 싶다면 아래의 소개글도 도움이 될 것입니다.
WWDC 내용
- research and care app 을 만들어 볼 것입니다.
- 첫번째 단계입니다. onbarding 과 consent 에 대한 세션입니다.
ResearchKit 은 Apple 이 GitHub 로 유지하는 오픈소스 iOS framework 입니다. 참가자가 신체적 또는 인지적 운동과 같은 활동을 수행하는 동안 동의 수집, 설문 조사 관리 및 센서 데이터 기록을 위한 UI 요소를 제공합니다.
마찬가지로 CareKit 도 오픈소스 프레임워크이며, 환자를 상대하는 치료 앱을 구축하는 데 도움이 되도록 설계되었습니다. 이 기능은 사용자가 원하는 작업을 예약하는 데 탁월합니다. 약을 복용하거나 의사를 부르는 등 원하는 작업을 예약하는데 탁월합니다. 또한 건강 관련 데이터를 위한 안전한 지속성 레이어를 제공하고 차트 작성 유틸리티를 갖추고 있습니다.
과거 WWDC 세션에서는 이 두 가지 형제 프레임워크에 대해 자주 논의했지만 올해는 이 두 가지 프레임워크를 함께 사용하여 훨씬 더 나은 환경을 만들 수 있는 방법을 보여드릴 것입니다.
✍️ WWDC 를 진행하다가 갑자기 페이스타임이 와서… 받더라구요…? 중간중간 지루하지 않은 연출과 흥미로운 상황을 만드는 모습이 보여서 번역해보았습니다. 다음은 자막 번역의 전문입니다.
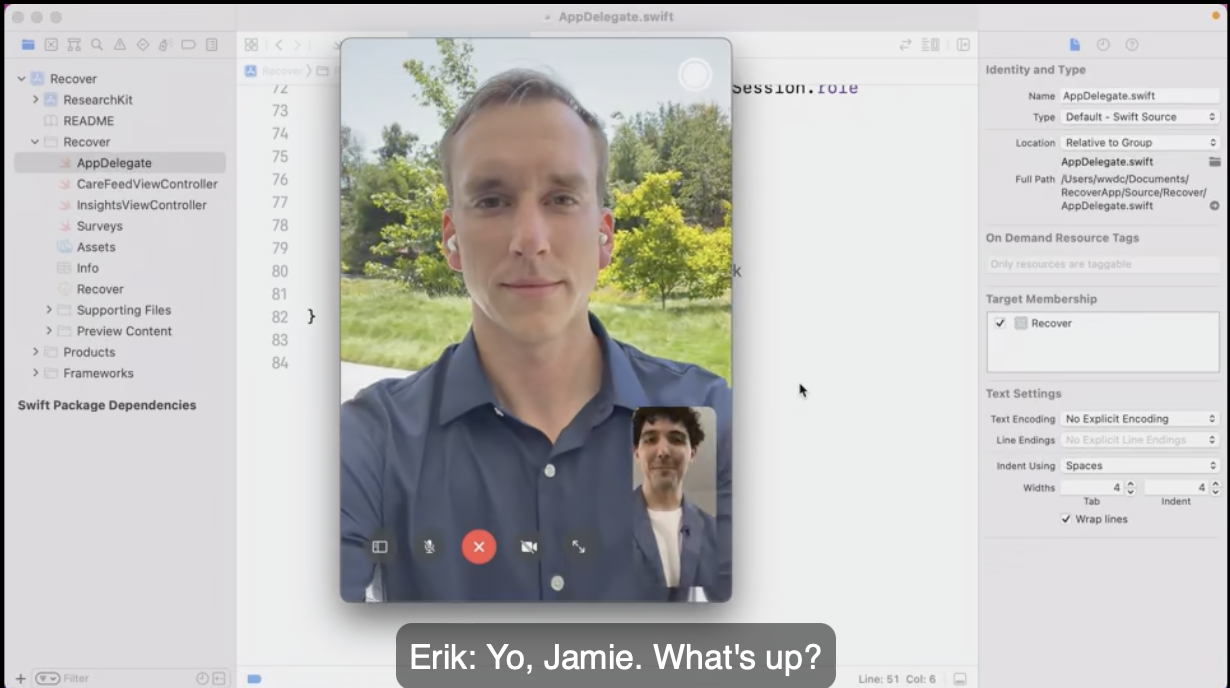
🤦♂️ Erik: 환자를 위한 경험… 죄송합니다. 그냥 무음으로 할 걸 그랬나? 자르고 갈까?
Crew: 아니, 그냥 받아.
🤦♂️ Erik: 야, 제이미. 무슨 일이야?
🤦🏻♂️ Jamie: 안녕, 에릭. 네가 지금 WWDC를 준비하느라 바쁘다는 건 알지만, 우리 물리치료 연구 앱에 자금이 들어왔다는 걸 말해주고 싶었어! 이 최첨단 연구가 정말 많은 사람들에게 도움이 될 거야! 그래서, 우리가 그 앱의 첫 번째 rev(=revision)을 당장 내놓을 수 있을 것 같아?
🤦♂️ Erik: 헤이, 제이미, 그거 정말 대단한 소식이야. 그리고 난 정말 흥분돼. 중요한 건 우린 지금 Dub Dub의 코드 진행중이라는 거에요.
🤦🏻♂️ Jamie: 아, 그럼 벌써 코딩을 하시는 건가요? 완벽하네요! 이 앱은 Recover 라고 불릴 겁니다. 수술 후 참가자들이 무릎을 튼튼히 할 수 있도록 도와주는 물리치료 앱이 될 것입니다. 그리고 game changer가 될 것입니다! 저는 많은 훌륭한 아이디어를 가지고 있습니다. 하지만, 우선, 참가자들이 앱을 사용하기 전에 연구에 참여하는 것에 동의해야 합니다 모든 법률 용어에 대해 설명해야 합니다. 하지만 겁을 주지 않는 방법으로 하고 싶습니다, you know? 참가자들의 서명을 받아 데이터 공유에 동의하도록 해야 합니다. Uh, one sec, Erik, 임상팀으로부터 메시지를 받고 있습니다. 첫 번째 참가자들은 월요일에 수술 후(post-op) 퇴원할 것 같습니다. Erik, 일단 onboarding 을 시작할 수 있을까요? 나머지 팀원들을 따라잡아야 하는데, 잠시 후에 다시 전화 드리겠습니다. 정말 좋을 것 같습니다.
🤦♂️Erik: OK. Uh… Alrightly then! 이것이 우리의 코드일 일 것 같네요!
Recover 이라는 앱의 onboarding 에 대해서 코드를 작성해봅시다.
Onboarding and consent
참가자에게 우리가 수집할 데이터, 액세스할 수 있는 사람, 무엇을 위해 사용될 건지, 보관 기간을 설명하고 이해하기 쉽게 만드는 것이 가장 중요합니다.
앱에서 이 중요한 부분을 올바르게 수행하는데 도움이 되는 ReserachKit 의 몇 가지 새로운 모범 사례를 보여드리겠습니다. 그리고 보너스로 온보딩 및 동의 flow 를 CareKit 기반 앱에 적용하는 영리한 방법을 보여드리겠습니다.
-
구체적으로, 표준
CareKit앱을 설정하지만, 참가자가 care plan 의 동의 컨텐츠가 공개되기 전에 온보딩을 완료해야하는 방식입니다.
-
이러한 consent and onboarding flow 의 부분으로 참가자에게 무엇을 요청하는지 알려주는 몇 가지 지침 단계를 구축할 것입니다.
실제 동의 부분으로 넘어가기 전에 이와 같이 참가자를 안내하는 것이 경험을 개선하는 데 실제로 도움이 된다는 것을 알게 되었습니다.
-
서명을 수집하는 방법에 대해서 알아볼 것입니다.

-
온보딩의 일부로 ResearchKit 을 사용하여 HealthKit, notifications, device motion 에 대해서 미리 권한 승인을 요청하는 방법도 알아볼 것입니다.

Recover
session resources 에 있는 starter project 를 통해서 진행하겠습니다.
https://github.com/carekit-apple/WWDC21-RecoverApp
(해당 깃허브 레포지토리에 Setup 방법이 있습니다.)
Setup
- Download the repository and the required submodules:
git clone --recurse-submodule https://github.com/carekit-apple/WWDC21-RecoverApp.git
- Choose the target named
Recoverand run the app.
(Recover Part1 의 Recover 을 선택하면 됩니다.)
CareKit
CareKit 은 미리 SPM 을 통해서 세팅되어 있습니다.
https://github.com/carekit-apple/CareKit
Get Started!
4개의 파일을 이번 세션에서 다룰 것입니다. 첫번째로 AppDelegate 입니다. 여기에서 CareKit store 와 상호작용할 것입니다.
Files
AppDelegate.swift: Contains logic that sets up the CareKit store.Surveys.swift: Defines ResearchKit tasks such as surveys and onboarding.CareFeedViewController.swift,InsightsViewController.swift: Building out the UI for our app.
Starter APP
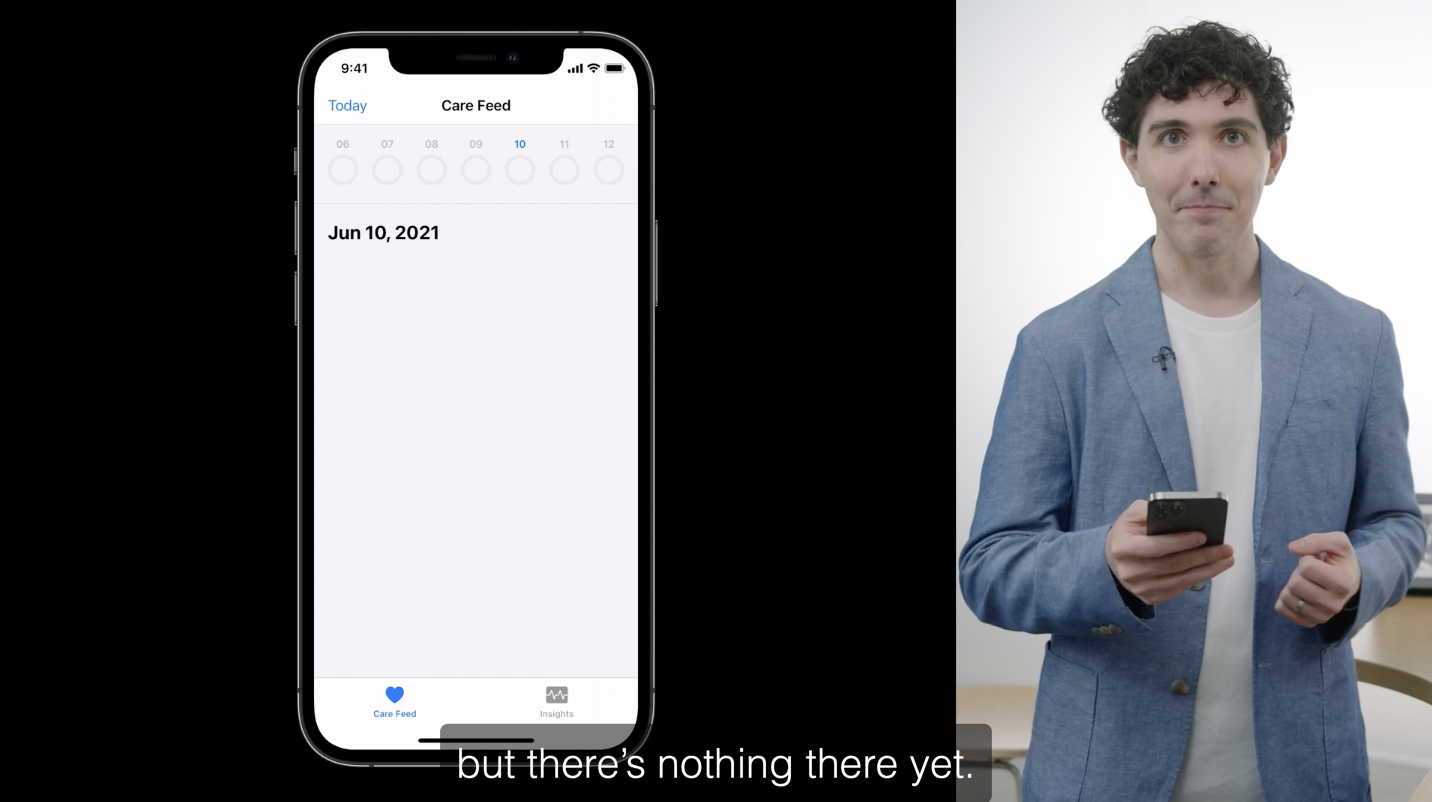
starter app 을 실행하게 되면 지금은 사실상 아무것도 없습니다. 컨텐츠가 없는 OCKDailyPageViewController 가 있을뿐입니다. 하단에 Insights 탭도 있지만 비어있습니다. part 3 동안 이것들을 채울 것입니다.
이제 참가자의 feed 에 consent card 가 나타나도록 해봅시다. 이 consent card 는 나머지 앱에 대한 액세스를 제공합니다. 완료되기 전까지 다른 작업이 표시되지 않으며, 완료된 후에는 다른 모든 작업이 표시되어야 합니다.
AppDelegate
import CareKit
import CareKitStore
import UIKit
import os.log
@main
class AppDelegate: UIResponder, UIApplicationDelegate {
let storeManager = OCKSynchronizedStoreManager(
wrapping: OCKStore(
name: "com.apple.wwdc.carekitstore",
type: .inMemory
)
)
func application(
_ application: UIApplication,
didFinishLaunchingWithOptions
launchOptions: [UIApplication.LaunchOptionsKey: Any]?) -> Bool {
seedTasks()
return true
}
// MARK: UISceneSession Life Cycle
func application(
_ application: UIApplication,
configurationForConnecting connectingSceneSession: UISceneSession,
options: UIScene.ConnectionOptions) -> UISceneConfiguration {
UISceneConfiguration(
name: "Default Configuration",
sessionRole: connectingSceneSession.role
)
}
// MARK: Seeding the Store
private func seedTasks() {
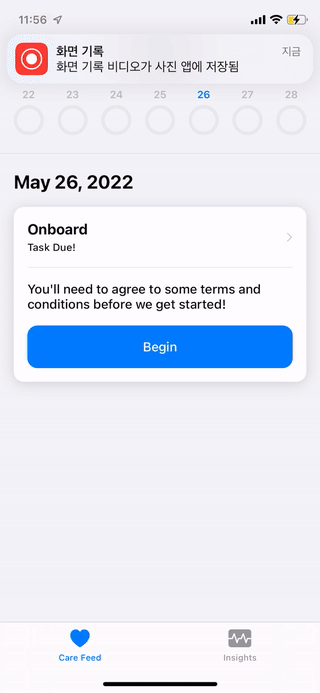
// 1.1 Persist an onboarding task
// 얼마나 자주 표시되는지 지정하는 schedule 을 정의해야합니다.
// 온보딩을 위해 참가자가 동의를 할때까지 매일매일 schedule 사용.
let onboardSchedule = OCKSchedule.dailyAtTime(
hour: 0, minutes: 0,
start: Date(), end: nil,
text: "Task Due!",
duration: .allDay)
// 방금 만든 schedule 을 일정을 전달해서 task 를 정의해야합니다.
// id 는 원하는 대로 지정하고, 고유하면된다. 현재는 다른 파일에서 선언된 상수를 사용합니다.
var onboardTask = OCKTask(
id: TaskIDs.onboarding,
title: "Onboard",
carePlanUUID: nil,
schedule: onboardSchedule)
// instructions 를 지정하고, 온보딩을 고수하는 것이 영향받지 않아야 한다는 것을 나타내야 합니다.
/// Instructions about how this task should be performed.
onboardTask.instructions = "You'll need to agree to some terms and conditions before we get started!"
/// If true, completion of this task will be factored into the patient’s overall adherence. True by default.
onboardTask.impactsAdherence = false
// 이것은 기본적으로 대부분의 CareKit 맨 위에 완료링을 채우는 것으로 간주되지 않는 다는 것을 의미한다.
// store 에 task 를 유지할 수 있다.
storeManager.store.addAnyTasks([onboardTask],
callbackQueue: .main) { result in
switch result {
case let .success(tasks):
Logger.store.info("Seeded \(tasks.count) tasks")
case let .failure(error):
Logger.store.warning("Failed to seed tasks:\(error as NSError)")
}
}
}
}
이제 온보딩 작업을 store 에 준비했습니다. 참가자의 피드에 보여줄 준비가 되었습니다.
CareViewController
import CareKit
import CareKitStore
import CareKitUI
import ResearchKit
import UIKit
import os.log

final class CareFeedViewController: OCKDailyPageViewController,
                                    OCKSurveyTaskViewControllerDelegate {

    /// 사용자가 새 날짜로 스와이프할 때마다 호출됩니다.
    /// 날짜를 검사하고, 해당 날짜에 표시할 내용을 결정한 다음, 적절한 내용을 listViewController에 추가하는 것이 일입니다.
    override func dailyPageViewController(
        _ dailyPageViewController: OCKDailyPageViewController,
        prepare listViewController: OCKListViewController,
        for date: Date) {

        // 먼저, 참가자가 온보딩을 완료했는지 확인해야 합니다.
        // 1.3 Check if onboarding is complete.
            checkIfOnboardingComlete { isOnboarding in

                // 1.5 If isn't, show an onboarding card.
                guard isOnboarding else {

                }
            }
    }

    // 1.2 Define a method that checks if onboarding is complete
    /// 메서드 안에 OCKOutomeQuery를 만들고 온보딩 작업과 관련된 모든 결과를 쿼리합니다.
    private func checkIfOnboardingComlete(_ completion: @escaping (Bool) -> Void) {
        var query = OCKOutcomeQuery()
        query.taskIDs = [TaskIDs.onboarding]

        // query 를 가지고 결과가 반환되었는지 여부를 확인한다.
        storeManager.store.fetchAnyOutcomes(
            query: query,
            callbackQueue: .main) { result in
                switch result {
                case .failure:
                    Logger.feed.error("Failed to fetch onboarding outcomes!")
                    completion(false)

                // 없다면 온보딩이 아닉 완료되지 않은 것.
                case let .success(outcomes):
                    completion(!outcomes.isEmpty)
                }
            }
    }

    // 1.6 Refresh the content when onboarding completes
}
- 다음 단계는 이 온보딩 흐름을 설정하는 것입니다. 바로 여기서 ResearchKit 설문조사를 제공하는 CareKit 작업 카드를 만들고자 합니다. 하지만 그러기 전에 실제로 ResearchKit 설문조사를 만들어야 합니다. Survey.swift 로 이동해서 해당 작업을 수행해보겠습니다.
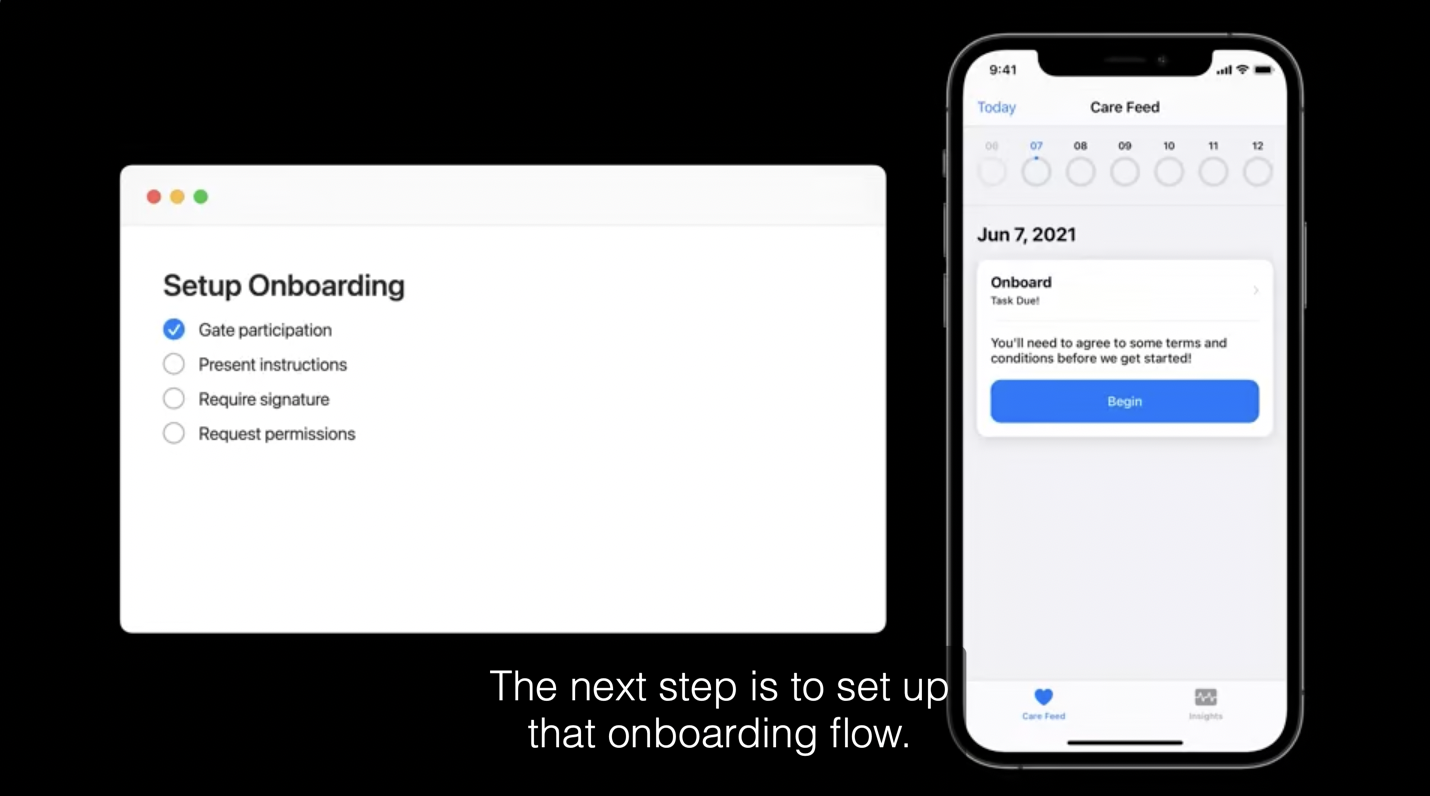
지금까지의 단계입니다.
Survey
- onboarding survey 는 5가지 단계를 가지고 있습니다.
- welcome step, instruciton step, signature step, permissions step, and completion step
import CareKitStore
import ResearchKit
struct Surveys {
private init() {}
// MARK: Onboarding
// 1.4 Construct an ORKTask for onboarding
static func onboardingSurvey() -> ORKTask {
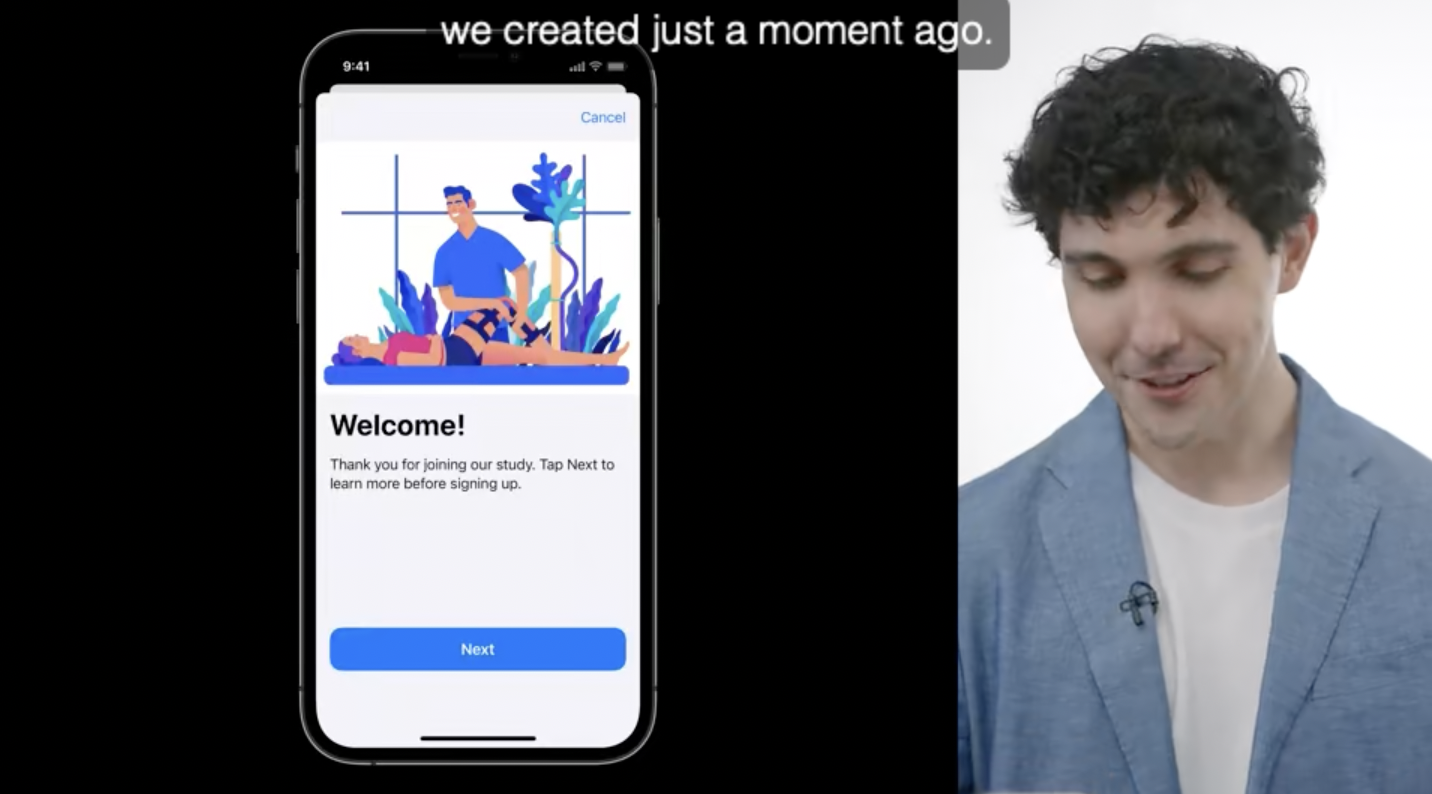
// 1.4.1 The Welcome Instruction step.
let welcomeInstructionStep = ORKInstructionStep(
identifier: "onboarding.welcome"
)
welcomeInstructionStep.title = "Welcome!"
welcomeInstructionStep.detailText = "Thank you for joining our study. Tap Next to learn more before signing up."
welcomeInstructionStep.image = UIImage(named: "welcome-image")
welcomeInstructionStep.imageContentMode = .scaleAspectFill
// 1.4.2 The Informed Consent Instruction step.
// ...
// 1.4.3 The Signature step (using WebView).
// ...
// 1.4.4 The Request Permissions step.
// ...
// 1.4.5 Completion Step
// ...
}
}
1.4.1
- 세션의 후반부에 등장한 뷰를 캡쳐했다.
1.4.2

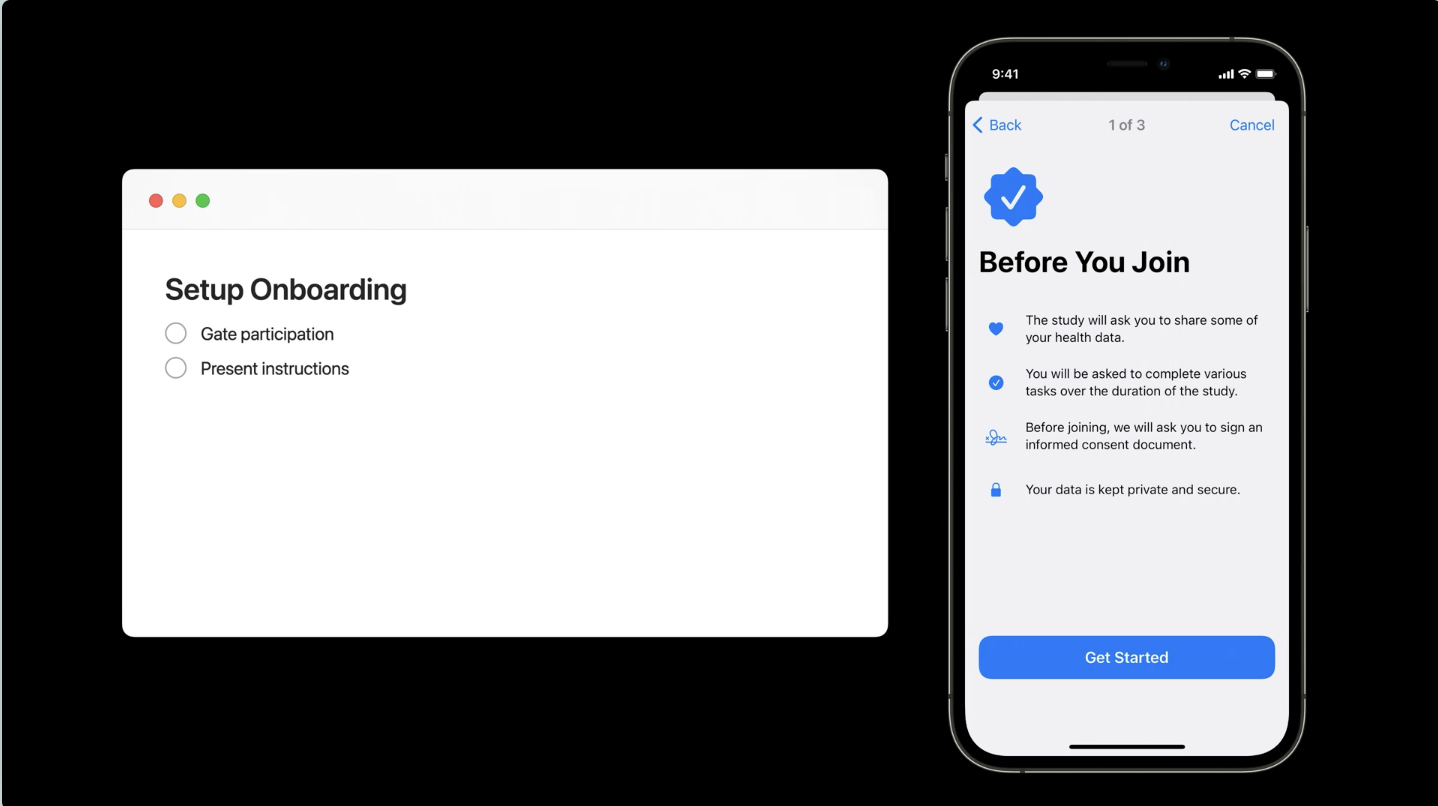
// 1.4.2 The Informed Consent Instruction step.
        let studyOverviewInstructionStep = ORKInstructionStep(
            identifier: "onboarding.overview"
        )

        studyOverviewInstructionStep.title = "Before You Join"
        studyOverviewInstructionStep.iconImage = UIImage(systemName: "checkmark.seal.fill")

        // 본문 항목 만들기.
        // 글머리 대신 이미지를 사용합니다.
        let heartBodyItem = ORKBodyItem(
            text: "The study will ask you to share some of your health data.",
            detailText: nil,
            image: UIImage(systemName: "heart.fill"),
            learnMoreItem: nil,
            bodyItemStyle: .image
        )

        let completeTasksBodyItem = ORKBodyItem(
            text: "You will be asked to complete various tasks over the duration of the study.",
            detailText: nil,
            image: UIImage(systemName: "checkmark.circle.fill"),
            learnMoreItem: nil,
            bodyItemStyle: .image
        )

        let signatureBodyItem = ORKBodyItem(
            text: "Before joining, we will ask you to sign an informed consent document.",
            detailText: nil,
            image: UIImage(systemName: "signature"),
            learnMoreItem: nil,
            bodyItemStyle: .image
        )

        let secureDataBodyItem = ORKBodyItem(
            text: "Your data is kept private and secure.",
            detailText: nil,
            image: UIImage(systemName: "lock.fill"),
            learnMoreItem: nil,
            bodyItemStyle: .image
        )

        studyOverviewInstructionStep.bodyItems = [
            heartBodyItem,
            completeTasksBodyItem,
            signatureBodyItem,
            secureDataBodyItem
        ]
1.4.3

// 1.4.3 The Signature step (using WebView).
        // 다행히도 ResearchKit 에서 이 부분을 쉽게 구현 가능합니다.
        // signature 은 ORKWebViewStep 으로 수집할 수 있습니다.
        // informedConsentHTML 은 HTML 언어로 작성되었고 WebView 를 사용할 수 있습니다.
        let webViewStep = ORKWebViewStep(
            identifier: "onboarding.signatureCapture",
            html: informedConsentHTML
        )

        // true 로 설정하게되면, ResearchKit 에서 signature box 를 표시합니다.
        webViewStep.showSignatureAfterContent = true
1.4.4
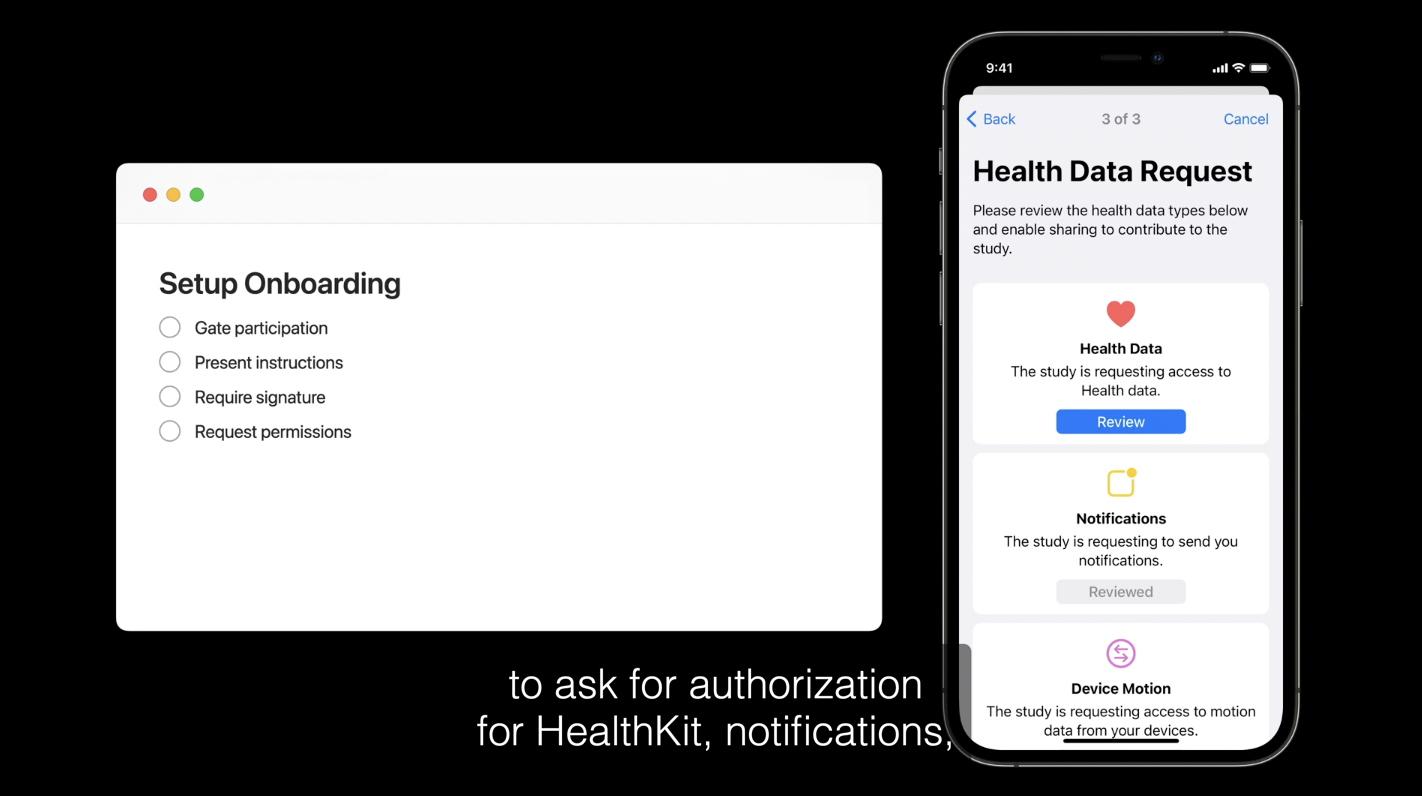
// 1.4.4 The Request Permissions step.
        // HealthKit 권한을 수집합니다. HealthKitPermissionType 을 두가지 지정해야하는데 쓸 권한과 읽을 권한입니다.
        // (wwdc20 에서 소개한 타입.)
        let healthKitTypesToWrite: Set<HKSampleType> = [
            HKObjectType.quantityType(forIdentifier: .bodyMassIndex)!,
            HKObjectType.quantityType(forIdentifier: .activeEnergyBurned)!,
            HKObjectType.workoutType()
        ]

        let healthKitTypesToRead: Set<HKObjectType> = [
            HKObjectType.characteristicType(forIdentifier: .dateOfBirth)!,
            HKObjectType.workoutType(),
            HKObjectType.quantityType(forIdentifier: .appleStandTime)!,
            HKObjectType.quantityType(forIdentifier: .appleExerciseTime)!
        ]

        let healthKitPermissionType = ORKHealthKitPermissionType(
            sampleTypesToWrite: healthKitTypesToWrite,
            objectTypesToRead: healthKitTypesToRead
        )

        // wwdc21 에서는 추가적으로 새로운 두 가지 권한을 도입합니다.

        /// 알림 표시, 앱 배지, 사운드 재생에 대한 권한을 요청하는 type 입니다.
        let notificationsPermissionType = ORKNotificationPermissionType(
            authorizationOptions: [.alert, .badge, .sound]
        )

        /// device motion data 에 액세스를 요청하는데 도움이되는 type 입니다.
        let motionPermissionType = ORKMotionActivityPermissionType()

        // read and write, notification, activity 액세스 요청.
        let requestPermissionsStep = ORKRequestPermissionsStep(
            identifier: "onboarding.requestPermissionsStep",
            permissionTypes: [
                healthKitPermissionType,
                notificationsPermissionType,
                motionPermissionType
            ]
        )

        requestPermissionsStep.title = "Health Data Request"
        requestPermissionsStep.text = "Please review the health data types below and enable sharing to contribute to the study."
1.4.5
- 세션의 후반부에 등장한 뷰를 캡쳐했다.
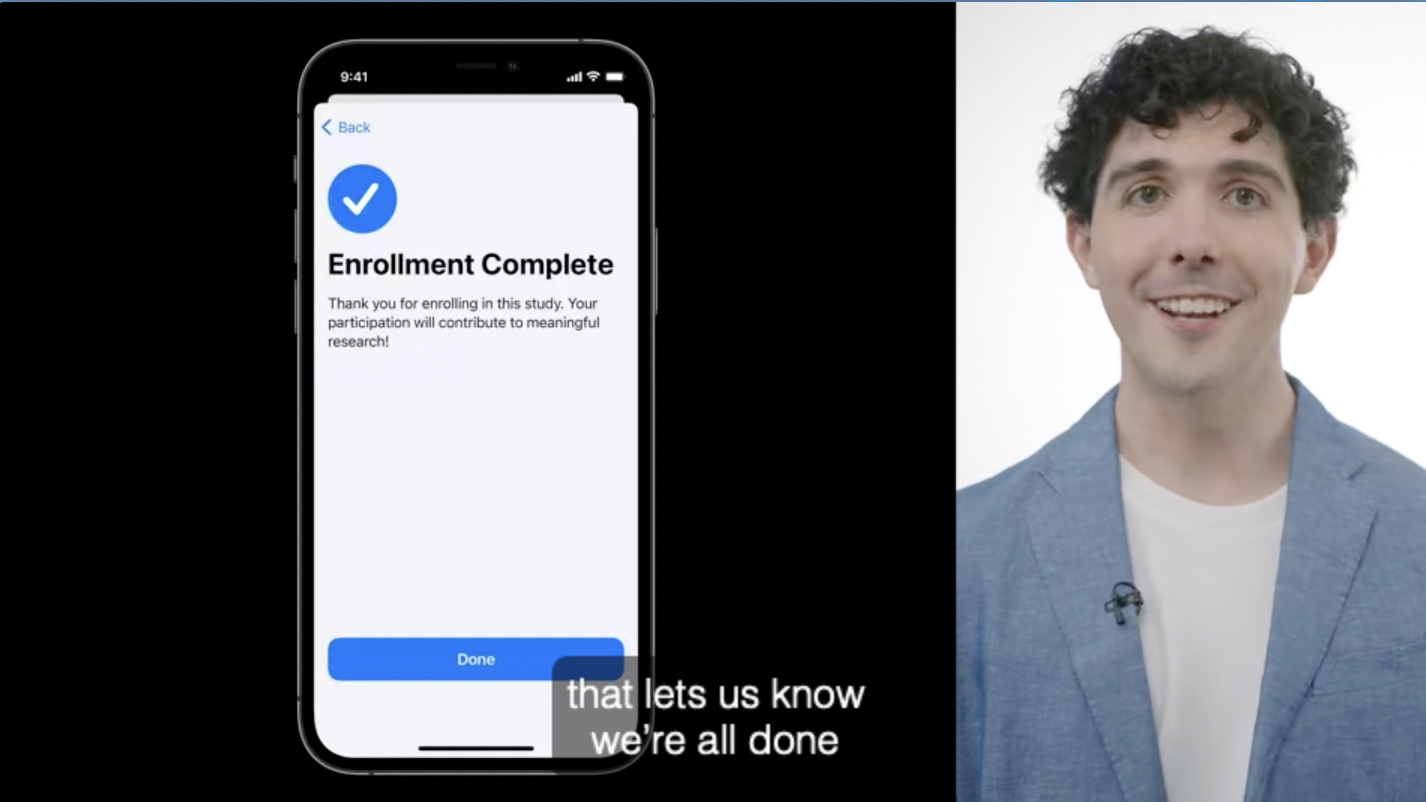
// 1.4.5 Completion Step
        // Jamie 의 연구에 참여해 준 것에 대해 감사하는 단계입니다.
        let completionStep = ORKCompletionStep(
            identifier: "onboarding.completionStep"
        )

        completionStep.title = "Enrollment Complete"
        completionStep.text = "Thank you for enrolling in this study. Your participation will contribute to meaningful research!"

        /// 지금까지의 ORKCompletionStep 을 통해 ORKOrderedTask 를 반환.
        let surveyTask = ORKOrderedTask(
            identifier: "onboard",
            steps: [
                welcomeInstructionStep,
                studyOverviewInstructionStep,
                webViewStep,
                requestPermissionsStep,
                completionStep
            ]
        )

        return surveyTask
CareFeedViewController 로 돌아가서 CareKit 기반의 앱에서 이 기능을 표시하는 방법을 다시 살펴보자!
CareFeedViewController
- 지금은 참가자가 온보딩을 완료한 날짜만 유지하면 충분하다고 말할 수 있다. 실제로 참가자가 온보딩을 마치면 피드가 새로고침되는지 확인하는 단계가 더 있습니다.
- 이를 위해서 OCKSurveyTaskViewControllerDelegate 의 대리자로 설정해서 delegate method 를 구현하는 것입니다.
// MARK: SurveyTaskViewControllerDelegate

// 1.6 Refresh the content when onboarding completes
    //
    func surveyTask(
        viewController: OCKSurveyTaskViewController,
        for task: OCKAnyTask,
        didFinish result: Result<ORKTaskViewControllerFinishReason, Error>) {

        // 참가자가 중간에 취소한 것이 아니라 온보딩을 끝까지 성공시킨 경우입니다.
        // 이때 피드의 새로고침 진행.
        if case let .success(reason) = result, reason == .completed {
            reload()
        }
    }
자, 이제 앱이 제대로 작동하는지 확인해 보겠습니다.
💡 단,
HealthKit을 사용하기 때문에 해당 Bundle Identifier 를 App Deleveloper 에서 등록해줘야 합니다~!
온보딩이 끝나게되면 consent 를 완료하라는 메시지가 더 이상 표시되지 않습니다. 대신, 앱의 모든 내용이 표시됩니다.
다음 세션에서 이 내용을 살펴보겠습니다!
✍️ Hey Siri, can you message Jamie and tell him that we’re done with the onboarding and consent?
크… 간지